Friday, April 27, 2012

Project: Kids bathroom redo

 We repainted the kids bathroom back in February.....and I finally finished it!   Nice to check something off the list.


The room started as a dark blue color.  Nice, but it didn't match any of my (3) shower curtains.  My friend had some leftover paint that I thought might match one, so we tried it.


 OOPS!  Have you ever had one of those - it was better before I did that - moments?  I tried to make myself like it as we finished painting it at 1 am.  Even after my husband pointed out that I would choose NOT to rent a house just because of a room like that......he was right.  And when I looked at it again in the morning I disliked it even more.  Okay, so I hated it.  Thank goodness there was paint leftover from my bathroom!  It was a nice shade of gray by evening.


Do you have any toilets that do this?  Gross!  I took the opportunity to add some caulk around the base....of all the toilets in the house.  Youtube it.  It is really very easy, and super quick!  And I did 3 toilets and re-caulked 2 showers for $10.  Totally worth it.


Ahhhh.....happy "not so much grossness to clean" to me!


 I put some hooks on the back of the door to hide the kids towels.  They dry better this way anyway.
 I found some really cute bathroom printables here and gradually rounded up frames from the local thrift store. (Spray painted to match) I cut a square of foam board and covered it with some scrap fabric for the center square.  If I find a frame about that size I'll add the "comb your hair" print instead.  If you want some tips for how to hang a collage check out this post.
 It all matches!  And it isn't fluorescent!
 And it only cost me $8....for frames.  All the paint was leftover from some other project, and I've had the shower curtain/towels for years.  Though to completely finish the project....
I'm going to have to buy some ceiling paint.  Seriously people.  If you are going to take the time to put color on your walls, take the time to do it right!  Or no one will be able to appreciate the beautiful color you picked - all they will see is a crappy paint job.  Okay, so maybe thats just me :0)

Photobucket

Thursday, April 26, 2012

Project: How to hang a photo collage

 When it comes to hanging pictures on the wall there are a million different opinions on how it should be done.  I tend to be an estimator....measure about where you want it, mark it with your finger and hammer in the nail.  All the while praying it is really in the right spot.
 But when it comes to hanging a collage of pictures, there are a few ways to save yourself a lot of headache.  I use 2 different ways, depending on the size of the collage.
For a large collage I lay the pictures out of the floor.  I always have rolls of huge paper on hand for the kids to use to their hearts content.  I cut a piece of paper the size of each frame.  I know it seems tedious but it is much easier that trying to position and reposition nails and frames all the while hoping the collage turns out the way you want it to.  I tape the papers to the wall and re-situate them until I like the way they come together.  Measure and mark on each paper where the hanger is on the back of the frame.  Nail through the paper, remove the paper, and hang your pictures!


 For a small collage I pull out the kids butcher paper (again) and cut a piece the size of the wall I want to fill.  I lay the pictures out how I want them on the paper then trace the frames.
 I measure and mark where the hangers on the back of the pictures are and then hang the paper on the wall.
Hammer through the paper then pull it off of the wall, leaving the nails in place.
Voila! A beautiful collage, and only one nail hole for each picture.

Photobucket

Monday, April 9, 2012

Project: Adding Some Color

My landlord left me with one stipulation regarding paint in my house.  Don't touch the living room.....or stairs....or upstairs hall.  Basically, leave the yellow alone!  And its yellow.....very yellow.  A good yellow.....but a LOT of yellow.  And the "accent" wall is about a half a shade different than the rest.  On sunny days its livable, on cloudy days its suffocating.  So I set about adding some color!
 The easiest way to add instant color is throw pillows.  Especially since my couches and my carpet are essentially the same color :(  
The red pillow is actually made from some curtains I had in my kitchen a few houses ago!  Here are the tutorials I used:

Gathered Pillow: Make It and Love It
Bow Pillow: E Tells Tales
Flower Pillow: I just made a standard envelope cover.  Then I took strips of fabric 3 inches wide and sewed a basting stitch down the center of each.  I gathered them, then sewed them in a circle.  Kind of like the pillow here, but instead of straight lines, its circular.


These two are just plain jane zipper pillow covers.  The green one has the pear fabric on the other side
 I pulled out the spray paint and added some color to my lamp bases.  Which I really really love!
 Remember those leftover blocks?  Haha.....here are some more!


I sprayed painted my flower pot and added a curtain to the bookshelf.  Just use a shower curtain rod!  It works beautifully, and is sturdy.  This is my kids bookcase, and it gets used often.  I haven't had the curtain fall down once.


I would totally leave the open bookshelf if it was in a playroom, but its in my living room - I'll take the curtain.
This shelf above the front door has been a puzzle to me since we moved in.  Its at least half hidden, from some angles fully hidden by the chandelier.  What do you put up there?  Not something you want to be able to see well!  These pots (and the frame actually too) were $1.99 each at a local thrift store.  The pots were white with a blue design on them. (Sorry I didn't take a before picture!)  Add a little spray paint and viola!  For $6 I'm happy with it......for now :)

Of course there is the palm tree pot from before as well.  That was a nice stroke of red too.  And I think that about sums it up.

Overall - it is 100% better.  Not as great as a new paint job, but much cheaper and following the rules.

Photobucket

Tuesday, April 3, 2012

Project: Pom Pom Valance

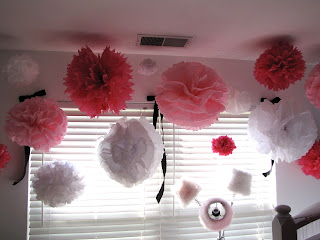
So back around St. Patricks day I showed you the pom poms I made for the table decor.  They really are SO fun.  I decided to add some to the window in my girls room.  You can find the how-to for them from Martha Stewart.
Such a fun splash of color!


They turned out great!!  My girls LOVE them, and it really filled up a huge blank wall.  Best of all, it only cost me a few dollars! Again I  hung them with fishing line, from thumb tacks in the ceiling.


They look like they are floating...


I just put up a few black riibbons to frame the window a bit and tie in the color.  The pom-poms cast such a fun light in the room, and really are very....very girly.
I even added one to the canopy, amidst all the stars
I'm so close to being done I can almost taste it!!  Just one little project left and the before and after will be complete.  Whether you want to see it or not, I am excited to show you!!


Photobucket

Monday, April 2, 2012

Project: Easter Carrot Cupcakes

These cupcakes go perfectly along with any bunny or easter themed party!
I found the idea somewhere in the vast reaches of the internet last year.  I cannot for the life of me figure out where I got it.  So to whomever posted the idea originally - thank you!!

Here's how:
I just used a regular chocolate cake mix to make the cupcakes.  Frost them with chocolate frosting and I think it would be cute to add brown sprinkles.  

For the carrots just stick a marshmallow with a toothpick, then dip them in orange chocolate (wilton brand chocolate melts is what I used) and dip the tip of the marshmallow in orange sugar sprinkles.  When they had hardened I just stuck the toothpick down in the cupcake to stick them on.

For the green tops - I think the original poster had used cut up green fruit roll ups or something.  But I didn't have that so I used the green paper easter basket filler stuff.  I just piped some of the melted orange chocolate around the bottom to stick them on the carrot.

They turned out so cute!  And the kids all loved the chocolate covered marshmallows,

Another fun thing we added to this party was this:
I picked up this idea over at Hostess with the Mostest.

Some of the other things we served were jelly bean jello jigglers, orange soda, cheezit crackers.....a little healthy, a little not.  We weren't serving a meal - just providing a few fun snacks.

Photobucket